Projection transfer sampler - centre and corners
by alidel
Projection transfer sampler: compare centre and corners
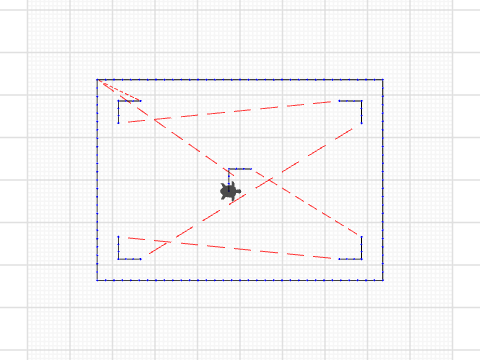
A small running-stitch exercise for textile classes and makers who use a projector to trace a stitch sampler onto paper before stitching. It also works with a printed or screen preview. The frame contains four equal right-angle corner motifs and a matching centre motif. Even when two corners look sharp, one side of a projected paper layout can be stretched or out of focus.
1. Open the project and run it. Keep it as drawn. Each L has two equal arms. Compare the centre with the four corners. The upper and lower rows should look the same except for orientation.
2. If tracing with a projector, place the paper flat. Compare the apparent lengths of the horizontal and vertical arms in the centre and at each corner with the same ruler. Compare the widths of the frame at the top and at the bottom. You can choose any comfortable size, but keep the same scaling for both axes. Note which corners look soft and which measurements differ.
3. If one side is wider, align the projector square to the paper and repeat before tracing. If the frame measures evenly and one corner is still soft, check focus at the centre and the edges. The Alidel X500 picture setup gives the centre-and-corner focus check and guidance on physical alignment for that model:
https://alidel.kz/guides/ultravision-x500-pervyy-zapusk-hdmi
4. Inspect jumps between motifs and between the frame and the centre before exporting. Trim or handle transitions according to your machine and use a scrap of fabric for a first physical test. The geometry was checked in software. No fabric or projector test was performed.
Remix challenge: change the length of every arm by the same amount, preserving the right angles. Compare what you see when you deliberately stretch only the width of the preview.
Creative Commons Attribution-NonCommercial-ShareAlike (CC BY-NC-SA) license .

Comments (0)
No comments yet